Volume management
Edgehog’s Volume Management section offers a straightforward way to create and control persistent storage. Behind the scenes, all volumes correspond directly to Docker volumes, meaning Docker is responsible for allocating, storing, and preserving the data. This guarantees that the information survives container rebuilds or replacements.
A volume on its own has no practical effect until it is assigned to a container. You can link a volume to a container through the Container Management section.
Volume Components
Each volume consists of the following fields:
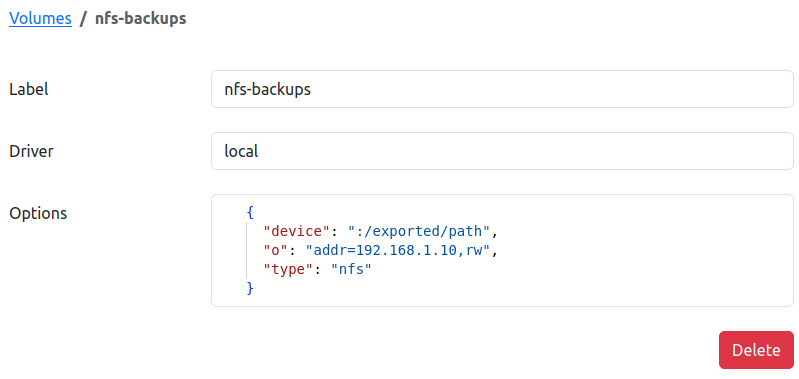
Label
A user-defined name used to identify the volume within the application. This helps distinguish volumes when they are attached to multiple containers or used across different services.
Driver
A volume driver is the backend that Docker uses to create, store, and mount volumes (persistent data) for containers.
By default, Docker uses the built‑in local volume driver, which stores volume data on the Docker host’s filesystem and mounts it into containers when requested. User may configure other drivers depending on environment or storage backend.
Options
The Options field contains driver-specific configuration parameters. These are passed directly to Docker without modification.
Driver options follow a simple key : value structure, for example:
{
  "type": "nfs",
  "o": "addr=192.168.1.10,rw",
  "device": ":/exported/path"
}
Note: Since these options depend entirely on the selected driver, Edgehog does not perform validation on them. Providing incorrect or unsupported options may cause Docker to fail when creating or using the volume.
Managing Volumes
Through the Volume Management section, you can:
- Create a new volume
- View volume details and driver configuration
- Delete a volume (when not used by a container)
Creating a Volume in Edgehog
Navigate to the Volumes section of the Edgehog web interface.
Click Create Volume.
Fill out the volume configuration form:
- Label – Provide a descriptive name for the volume. (Required)
- Driver – Select a Docker-supported volume driver.
(Optional; defaults tolocalif not set) - Options – Enter a JSON object containing driver-specific configuration options.
(Optional; e.g., NFS configuration, mount flags, custom driver parameters)
Click Create to save the volume.
Using Volumes
Volumes can be attached to containers during the container configuration step when creating a release. This enables persistent storage that survives container restarts, updates, and recreation.
Attaching Volumes to Containers
When creating a container as part of a release:
- Navigate to the container creation step in the release workflow.
- Open the Storage Configuration section.
- In the Volumes field:
- Select an existing volume by its Label.
- Specify the Target path inside the container where the volume should be mounted.

Managing Existing Volumes
In the Volumes section of Edgehog, you can view a table listing all created volumes with key attributes such as Label and Driver
- You can search and filter volumes by label or driver.
- Clicking a volume’s Label opens a detailed page showing all configuration values.
- The Details page includes a Delete button.
- Note: A volume can only be deleted if it is not currently used by any container.
This provides a clear overview for inspecting and maintaining storage resources across your deployments.
Note: If no driver or options are specified, as mentioned earlier, Docker uses the default
localdriver, stores the volume on the host filesystem (typically under/var/lib/docker/volumes/), and it remains fully functional for mounting into containers.
Best Practices
- Volumes should only be removed when no container is using them.
- Use driver options carefully incorrect values may prevent Docker from creating or attaching the volume.
- If you need to map host filesystem paths directly, consider bind mounts, not Docker volumes.