Network Management
In Edgehog, networks correspond directly to Docker networks. They are managed through Edgehog, allowing users to create reusable network specifications that can be referenced by multiple containers during the deployment process.
Network Components
Each network in Edgehog consists of the following fields:
Label
A user-defined identifier for the network. Labels help administrators organize and reference networks in both the Edgehog UI and API.
Driver
Docker networking is built around a pluggable system of network drivers, which define how containers communicate with each other, the host, and external networks.
If no driver is specified when creating a network in Edgehog, the default driver is bridge, reflecting Docker’s default behavior on Linux.
Below is an overview of the main built-in Docker network drivers:
bridge
- Default driver if none is specified.
- Creates a software bridge on the host; containers attached to the same bridge can communicate.
- External traffic is blocked unless ports are explicitly published.
- Uses NAT, so external systems see the host’s IP.
- Supports port publishing (e.g.,
-p 8080:80).
host
- Removes the container’s network namespace, giving it direct access to the host’s network stack.
- The container does not receive its own IP address.
- Port-publishing flags are ignored because the container binds directly to host ports.
- Useful for high-performance workloads or applications that manage many ports.
- Supported on Linux Engine and Docker Desktop 4.34+.
overlay
- Creates a multi-host network spanning multiple Docker daemons.
- Used in Swarm or multi-node deployments.
- Builds an overlay (e.g., VXLAN) on top of host networks.
- Supports encrypted traffic using
--opt encrypted. - Requires Docker Swarm to connect hosts; networks can be created as attachable.
macvlan
- Assigns each container its own MAC address, making it appear as a physical device on the network.
- Requires a parent physical interface and proper subnet configuration.
- Useful for legacy applications that require direct Layer-2 visibility.
- Containers using macvlan cannot directly communicate with the host unless additional configuration is performed.
ipvlan
- Provides fine-grained control over IPv4/IPv6 addressing and L2/L3 behavior.
- Attaches container interfaces directly to a host interface without a Linux bridge.
- Reduces MAC address consumption (unlike macvlan).
- Supports modes like L2, L3, and L3S, configured using parameters such as
ipvlan_modeandparent.
none
- Disables all networking for the container except the loopback interface.
- Provides the highest form of network isolation.
Options
A JSON object defining driver-specific configuration parameters. The valid options depend on the selected network driver and can be found in the official Docker documentation.
Example Configurations
Bridge
{
  "com.docker.network.bridge.name": "br0",
  "com.docker.network.bridge.enable_icc": "true",
  "com.docker.network.bridge.enable_ip_masquerade": "true",
  "com.docker.network.driver.mtu": 1500
}
Overlay
{
  "encrypted": true
}
Macvlan
{
  "parent": "eth0",
  "macvlan_mode": "bridge"
}
Ipvlan
{
  "parent": "eth1",
  "ipvlan_mode": "l2"
}
Note: The options must match the capabilities of the selected driver. Refer to Docker documentation for all supported fields.
Internal
A boolean option that marks the network as internal. Containers on an internal network may communicate between each other, but not with any other network, as no default route is configured and firewall rules are set up to drop all traffic to or from other networks. Communication with the gateway IP address (and thus appropriately configured host services) is possible, and the host may communicate with any container IP directly.
By default, when you connect a container to an overlay network, Docker also connects a bridge network to it to provide external connectivity. If you want to create an externally isolated overlay network, you can specify the --internal option.
Enable IPv6
A boolean option that enables IPv6 support for the network.
Creating a Network in Edgehog
Navigate to the Networks section of the Edgehog web interface.
Click Create Network.
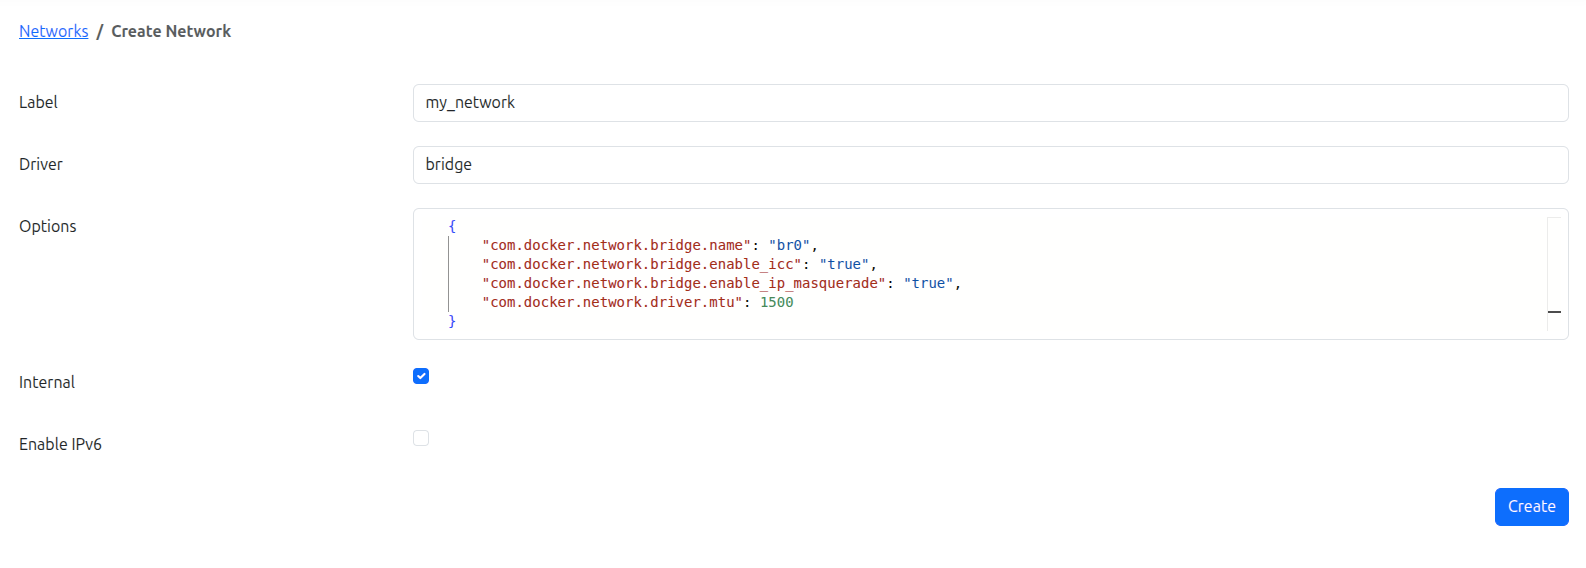
Fill out the network configuration form:
- Label – Provide a descriptive name for the network. (Required)
- Driver – Select a Docker-supported network driver. (Optional; defaults to
bridgeif not set) - Options – Enter a JSON object containing driver-specific configuration options. (Optional)
- Internal – Enable to restrict external access. (Optional)
- Enable IPv6 – Enable to allow IPv6 networking. (Optional)
Click Create to save the network.
Using Networks
Networks can be associated with containers during the container creation process in application management.
Associating Networks with Containers
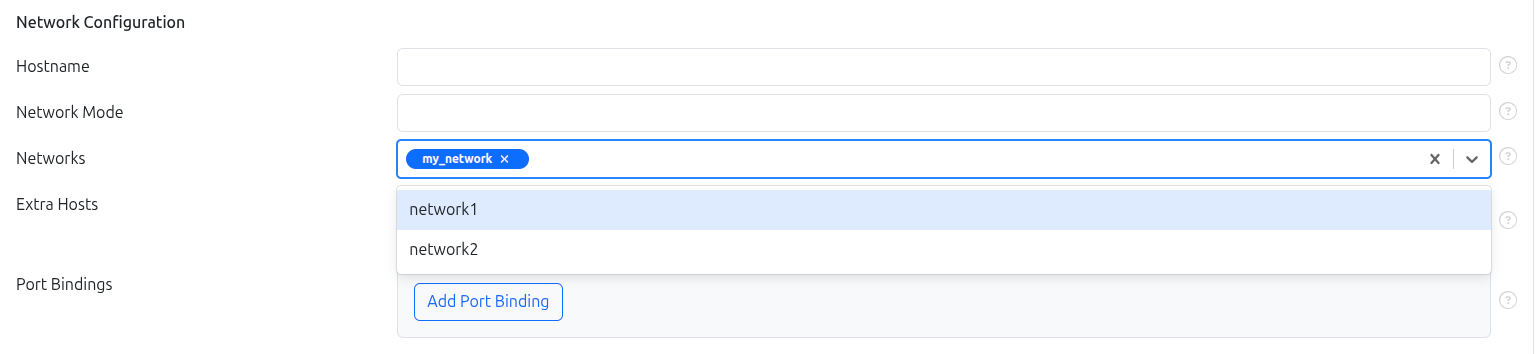
When creating a container as part of a release:
- Navigate to the container creation step in the release workflow.
- Go to the Network Configuration section.
- In the Networks multi-select field, choose one or more previously created networks by their Label.
This allows the container to connect to the selected networks and communicate according to the network’s configuration.
Managing Existing Networks
Viewing Networks
In the Networks section of Edgehog, you can view a table listing all networks that have been created. The table provides basic information such as Label, Driver, and other key details.
- You can search and filter networks by label or driver to quickly locate a specific network.
- Clicking on a network’s Label navigates to a detailed page showing all configuration details for that network.
- The Details page also includes a Delete button, which allows you to remove the network.
- Note: A network can only be deleted if it is not currently used by any container.
This makes it easy to manage, inspect, and verify network configurations across your deployments.
